Generate Synthetic Data Using Gretel Hybrid

One common characteristic of production data, regardless of industry or sphere of business is this: data is sensitive. Customer names, addresses, payment information, and other personally identifiable information (PII) are stored in production databases with strict security (and often regulatory) requirements. Gretel provides a way for customers to keep sensitive data within the boundaries of their own cloud tenant through Gretel Hybrid, which has been live and in use by customers for several months now. Customers are able to train models and generate privacy-guaranteed synthetic data from infrastructure they own and maintain, and their data never leaves their environment.
Kubernetes is the core compute service powering Gretel Hybrid. We support a “bring your own compute” approach across 3 major cloud providers–AWS, Azure, and GCP–via their managed Kubernetes services (EKS, AKS, and GKE). Terraform is a cloud agnostic infrastructure as code tool we’ve chosen to enable rapid hybrid deployments and feature delivery. Recently Gretel has released Terraform modules which empower customers to deploy Gretel Hybrid faster than ever. Our publicly available modules allow a user to deploy a “sandbox” or “proof of concept” environment in less than 30 minutes. They are also production ready and can be utilized by customers who are ready to fully operationalize Gretel Hybrid.
In this post, we will walk you through the steps to deploy Gretel Hybrid into your own AWS environment and generate some synthetic health data using a demo dataset. This will allow you to iterate and test Gretel Hybrid against your own sensitive datasets without sending any data to Gretel Cloud. Stick with us and follow along!
Want to know more about Gretel Hybrid before testing in your own environment? Check out our Gretel Hybrid documentation here! We have Gretel Hybrid deployment instructions for Azure and GCP. We detail exactly what metadata is sent to the Gretel API from your environment and we also provide a detailed architecture diagram.
Resource Overview 🔍
Here is the dependency diagram showing our available Terraform modules for Gretel Hybrid on AWS. We will be deploying all the below resources as part of this example, but you’re also able to utilize the individual modules in case you already have an existing VPC or EKS Cluster.
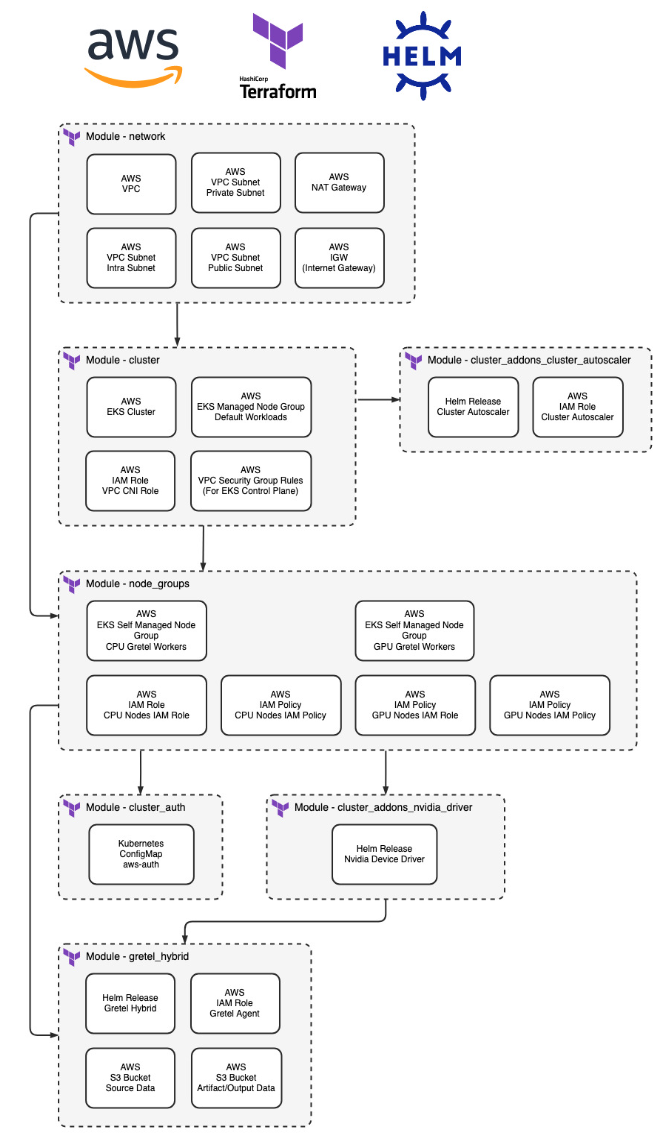
- network - Deploys the preliminary VPC which will be used by the Gretel Hybrid EKS Cluster.
- cluster - Deploys the EKS cluster and a default node group to run kube-system resources.
- cluster_addon_nvidia_driver - Deploys the Nvidia Device Driver helm chart for GPU nodes. This is required for Gretel Hybrid jobs to utilize the GPU attached to GPU based instance types.
- cluster_addon_cluster_autoscaler - Deploys the cluster-autoscaler helm chart for scaling node groups based on Kubernetes workloads. This allows us to minimize compute costs when Gretel Jobs aren’t running.
- node_groups - Deploys 2 EKS Node Groups. One for Gretel CPU workloads and one for Gretel GPU workloads. You can see which Gretel Models require GPUs here.
- cluster_auth - Manages the aws-auth ConfigMap for the EKS cluster.
- gretel_hybrid - Deploys the two necessary Gretel Hybrid S3 Buckets as well as the Gretel Hybrid helm chart.
AWS costs a concern? Any EC2 instances created by these modules will autoscale. The associated autoscaling groups are configured with a minimum size of zero. This means instances will only be created and running when pending Gretel Hybrid jobs exist. The total cost to deploy this infrastructure, run a Gretel Hybrid job, grab a coffee while the job is running, and delete the infrastructure afterward should be under $1! Minus the cost of your coffee of course. ☕
Walkthrough
As a prerequisite for following along, you will need an AWS Account with the proper permissions. Your AWS IAM User or IAM Role will need to be able to create and manage all of the resources laid out in the previous section’s diagram. For following along with this guide, we recommend using an AWS Sandbox account with admin level access.
1. Install Prerequisite CLI Tools ⌨️
First, we need to install the AWS CLI, the Terraform CLI, and the Gretel CLI. Here’s how:
AWS
Official installation instructions for Linux, MacOS, and Windows are available here. Confirm the CLI has been installed correctly by running the following command from your terminal.
Terraform
Official installation instructions for Linux, MacOS, and Windows are available here. Confirm the CLI has been installed correctly by running the following command from your terminal.
Gretel
The most common way to install the Gretel CLI is using pip. You may run the below command to quickly install it if you already have pip installed. If you need help installing pip, please consult the official pip documentation here.
curl and jq
We make use of curl to download a CSV file with some demo data to your local machine. We utilize jq to filter the json response from some Gretel CLI commands. If your operating system does not come with these utilities installed by default you will need to install curl and jq.
2. Deploy Gretel Hybrid on AWS ⚡
Now we’re ready to deploy Gretel Hybrid on AWS.
Authenticate with AWS
From your terminal, start by configuring your AWS CLI to use the appropriate credentials for your sandbox account. You may follow the official documentation here to authenticate your shell session appropriately. Your organization may have specific guidance on how to access an organization owned account. You can confirm proper AWS access by running the below command and verifying its output.
Clone the Gretel Hybrid Repository
Clone the Gretel Hybrid git repository with the following command.
Change directory into the full-deployment example.
Here is what our working directory looks like.
Configure Terraform Variables and Provider
Open the terraform.tfvars file and edit the list of variables as desired. You must customize the “gretel_source_bucket_name” and “gretel_sink_bucket_name” variables since all AWS S3 Bucket names must be unique globally.
After customizing the bucket names and any desired variables you may move on.
Edit the main.tf file and add the following on line 10 to define a blank AWS provider for Terraform which will cause Terraform to use the default AWS credentials which you have already configured.
Setup Gretel API Key
If you haven’t already, sign up for a free Gretel account at https://console.gretel.ai/.
You may directly retrieve your API Key after signing up by visiting this link and copying the key.
We must pass the API Key to Terraform for deployment. We don’t want to define a sensitive value in a cleartext file, so we will pass this variable to Terraform using an environment variable. Replace the below text inside the quotes with your copied Gretel API Key.
Deploy Gretel Hybrid on AWS
Run these terraform commands from the full_deployment directory.
Initialize terraform. This is an idempotent operation and is always safe to do (resources will not be created/destroyed).
View the changes Terraform will make upon deployment. Use this any time you make changes to take a closer look at what is going on.
Deploy the module. This will require user confirmation so don't walk away from your shell until you confirm by typing "yes" to start the deployment.
It will take 10-20 minutes for all the necessary resources to be deployed. Congratulations! You've deployed everything necessary to run Gretel Hybrid within your own cloud tenant.
3. Generate Synthetic Data Within Your Cloud Environment ☁️
We’re almost ready to start synthesizing data.
Configure the Gretel CLI
Since we will be running a test job with the Gretel CLI, we must first configure the Gretel CLI appropriately. Run the below command.
The configuration process will take you through step by step prompts to configure your Gretel CLI. You may hit “enter” to use the value in square brackets included in the prompt.
- For Endpoint hit enter to keep the default value.
- For Artifact Endpoint we will pass in the S3 URI of the gretel_sink_bucket_name from terraform.tfvars. The value will look like this: s3://gretel_sink_bucket_name. Make sure you update the value to point at your customized sink bucket name.
- For Default Runner enter hybrid
- For Gretel API Key pass in your Gretel API Key which we copied earlier.
- For Default Project hit enter to keep the default value.
The values should look like this.
Upload Sample Data to Your Source Bucket
You’ll need to upload the sample data to the source AWS S3 Bucket using the AWS CLI. You can do so with the following command. Make sure you change the value being set for the SOURCE_BUCKET variable to match the “gretel_source_bucket_name” you specified in your terraform.tfvars file. The sample healthcare CSV is located at this link.
Create a Gretel Project
Gretel Projects can be thought of as repositories that hold models. Projects are created by single users and can be shared with various permissions. Run the below command to create a project.
Generate Synthetic Data
We will take advantage of the GPU configuration within your Gretel Hybrid deployment and run our Gretel ACTGAN model against the demo data. Run the below command to schedule your Gretel Job. This can take anywhere from 5-15 minutes to complete.
Review Sample Data
Now that your Gretel Hybrid job has finished running, we can take a closer look at the sample synthetic data that was generated as part of the model training job. Make sure you set the SINK_BUCKET variable appropriately with the value from your terraform.tfvars file.
Now we can list the output artifacts from our model training job.
We will copy the sample data as well as the synthetic data quality report over to our local environment.
You can open the quality report with your browser of choice to take a closer look at the insight Gretel provides when you train a synthetic model. You can compare the data_preview.csv which is a small set of synthetic data against the source demo dataset contained in sample-synthetic-healthcare.csv.
(Optional) Generate More Synthetic Data
Want to generate more synthetic data? You can run the following command and choose the number of synthetic records you’d like to generate based on the previously trained model. This will result in another Gretel Job being scheduled to run within your Kubernetes cluster and may take ~5 minutes.
When the job finishes running we can take a closer look at the output artifacts using the below commands. First let’s list the run IDs within the sink bucket.
Now we will pass that ID into a variable as shown below. We will copy the synthetic data the same way we have done in the previous section.
Now you can compare the data.csv dataset against the source demo dataset contained in sample-synthetic-healthcare.csv.
Cleanup 🧹
If you would like to clean up the AWS resources you provisioned while following along, the following commands will delete all provisioned resources. Run them from the full_deployment directory. The destroy command will ask for confirmation before proceeding.
Wrapping Up
In this walkthrough we created all of the AWS resources necessary to deploy Gretel Hybrid and generate synthetic data, while keeping data within your own cloud tenant. We demonstrated the process using a sample healthcare dataset for model training. You can check out our Gretel Hybrid documentation for further reading, or watch this video tutorial!
Now that you’ve tried Gretel Hybrid, the next step is to try it out with your own data. You can be confident that your data remains secure in your environment , and is never passed to Gretel Cloud at any point. You can export a dataset as a CSV and follow along with the above guide, replacing the sample dataset with your own.
In addition to regular tabular data Gretel also supports relational data sources. Check out the Gretel Relational docs which are fully compatible with Gretel Hybrid.
Thanks for following along and happy synthesizing!